
User manual
Interior fittings
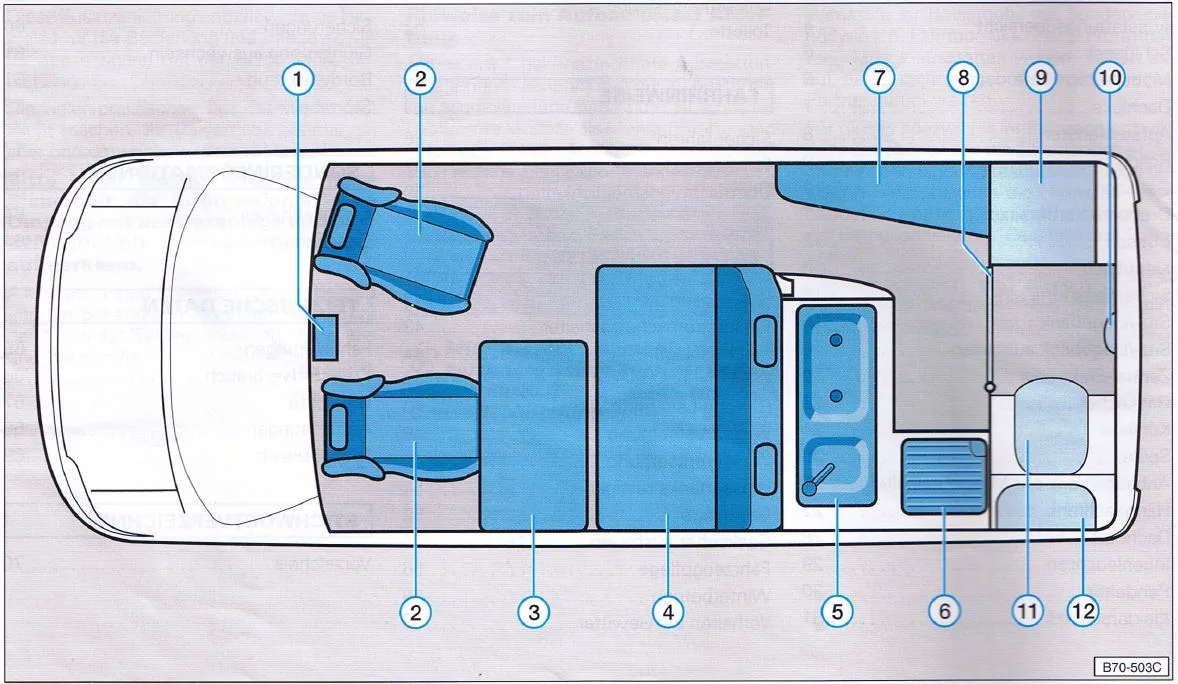
| 1 | Centre console |
| 2 | Swivel front seats |
| 3 | Dining tables / folding tables |
| 4 | Reclining seat / bench |
| 5 | Kitchen unit with sink, gas hob, waste water tank and gas cylinder holder |
| 6 | Fridge |
| 7 | Adjoining cupboard with bin bag holder |
| 8 | Hinged door with lock |
| 9 | Cupboard with compartment for valuables |
| 10 | Hatch release button |
| 11 | Bathroom |
| 12 | Folding washbasin |
In addition to the specified fittings, the bathroom area features a drinking water tank and a 220/230V power socket, which is also located in the living area beneath the folding table.
The roof bed platform is also situated above the swivel front seats.
Access from the outside to:
- Toilet waste cassette
- 220/230V power socket
- Fresh water inlet
- Drain outlet for the fresh water tank
- Drain outlet for the waste water tank
Keys
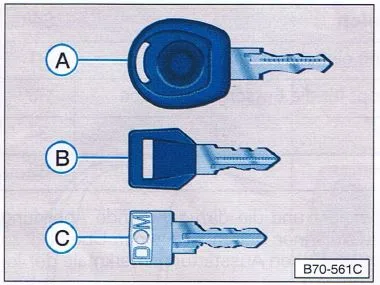
We will provide you with the following keys with your motorhome:
A. This key fits all locks except:
-
- Opening/closing the fresh water filler cap.
-
- Lockable storage compartment.
- Lockable storage compartment.
B. You can use this key to open and close the clean water inlet cap. The lock is located behind a flap on the outside at the rear
C. This key is for the valuables compartment located in the cupboard (9)
Opening the cupboards
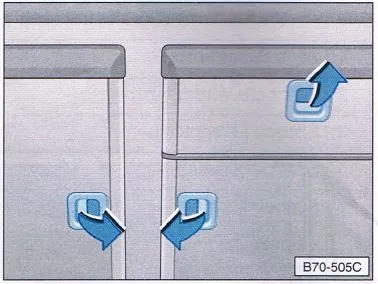
The drawers and doors are fitted with locks to prevent them from opening accidentally whilst driving. To open, pull the flap. It will be easier to unlock the drawers and doors if you press down on the drawer or door at the same time as pressing the button on the handle.
Roof hatch
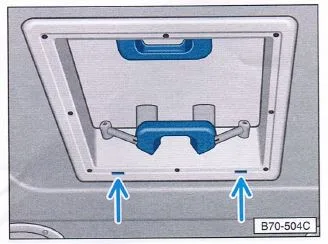
Before opening the roof skylight, lower the fly screen.
To open the skylight, push both handles upwards evenly. The skylight can be lowered to either side whilst open.
The fly screen can be removed for cleaning. To do this, unhook the screen from the recessed handle, turn it downwards and remove it.
To fit it, insert the screen with the two retaining tabs into the slots (arrows) in the frame, turn it upwards and secure it firmly.
Notes
- Open the sunroof when cooking to allow cooking vapours to escape.
- To prevent draughts and damage to the skylight, keep it closed whilst driving.
Hinged windows
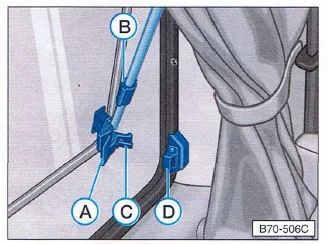
Opening the windows
Fully release the locking lever (A) on all the window latches. Then move the window to the desired position and turn the sleeve (B) on the bracket.
Closing the window
Turn the sleeve (B) on the bracket and lower the window.
Before closing the window, ensure that all the hooks (C) on the retainers are simultaneously behind the edge of the corresponding bracket (D).
Warning
: For safety reasons, all opening windows must always be closed and locked whilst the vehicle is in motion.
Roller blinds
All opening windows in the high-roof model are fitted with a blackout roller blind and a fly screen.
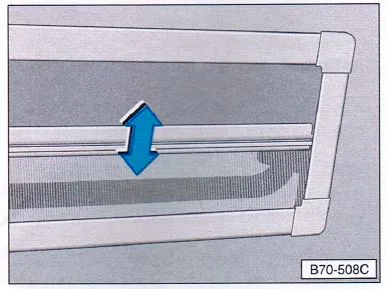
The illustration shows both roller blinds in a half-open position. Both roller blinds can be raised and lowered together or separately.
Insect
screen roller blind Pull the insect screen roller blind upwards from the bottom.
The roller blind can be adjusted continuously and locked in any position.
Blackout
blind Pull the blackout blind downwards.
The blind can be adjusted continuously and locked in any position.
Blinds
All interior windows can be darkened with curtains.
The cabin curtain is located inside the vehicle.
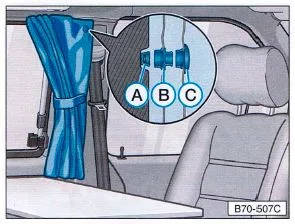
It is fastened from the inside using press studs and secured above the windscreen by folding down the two sun visors.
The illustration shows how the blind components are attached to the interior trim using the press stud.
The base of the press stud (A) is firmly attached to the interior trim. The closed press stud (C) on the curtain is pressed onto this base.
If the press studs from two sections of the curtain are to be attached to a single base (A), first press the section of the curtain onto the base to which the open press stud (B) is attached. Then press the section of the curtain with the closed press stud (C) onto the open press stud.
Swivel front seats
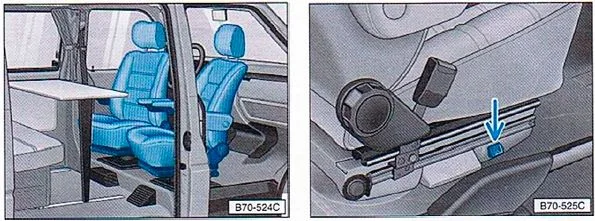
The front seats swivel and can therefore also be used in the lounge area.
The release mechanism for the swivel mechanism is located at the bottom right of the seat base on both seats. To release it, pull the lever upwards.
The passenger seats are swivelled anti-clockwise by pushing the driver’s seat right back. If necessary, open the doors and adjust the seat backs slightly forwards.
If the reclining seat/bench is to be converted into a reclining surface, first push the forward-facing front seats forwards beyond the front stop.
To do this, push the seat right up to the stop. Then press the lever (arrow) downwards and continue pushing the seat forwards until it passes the stop. This position is only permitted for adjusting the reclining surface.
Warning
-
- Before swivelling the driver’s seat, apply the handbrake or otherwise secure the vehicle to prevent it from moving (engage a gear or block the wheels).
-
- Swivel seats must always face forwards and be securely locked in place whilst driving.
-
- The two front seats must never be used if they have been moved forwards beyond the front stop.
Dining table
The dining table is secured to the inside of the cupboard door. Lift the lever upwards and pull the table out of its holder.
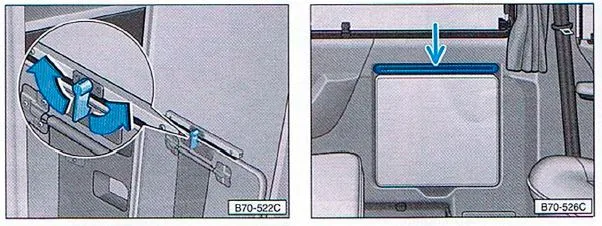
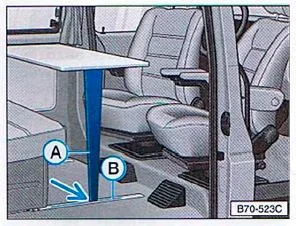
Assembling the dining table
-
- Position the tabletop at an angle of approx. 45° upwards on the retaining strip (arrow) on the side panel.
-
- Release the table leg (A) from the clamp at the bottom of the tabletop and tilt the table downwards.
-
- Place the end of the leg onto the right-hand seat bar (B) and slot it into place.
Dismantling the dining table
Dismantling is carried out in reverse order.
Please note that before releasing the table leg, you must press the latch (arrow) located on the inside of the leg.
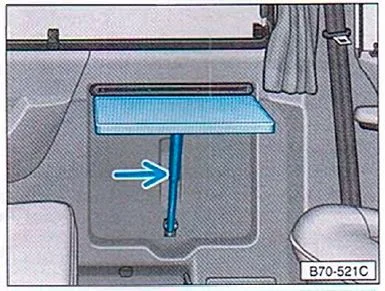
Folding table
-
- Release the tabletop from the clamping mechanism with a gentle tug and lift the table until it clicks into place.
-
- To fold it down, press the safety button (arrow) on the base of the table and lower the tabletop until it clicks into place.
Warning
: The folding table must not be set up whilst the vehicle is in motion, as there is a risk of injury in the event of an accident or sudden braking.
The table must therefore be folded away and locked in place during the journey.
Reclining seat / bench
Rear seat belt
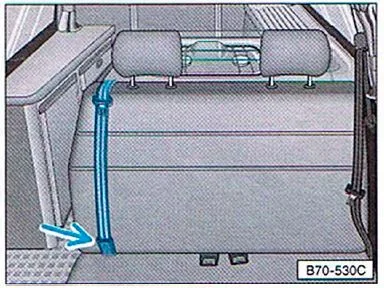
The automatic three-point seat belt on the right-hand side of the reclining bench seat (when viewed in the direction of travel) has the following feature:
In addition to the standard buckle section, there is another buckle section on the right-hand side of the seat. After removing the seat belt, it can be released completely by pressing the button on the right-hand locking section (arrow) so that the bench seat can be moved forwards more easily.
To prevent the button from being released accidentally whilst travelling, the locking mechanism is fitted with a sliding cover which must always enclose the locking mechanism.
When the reclining seat is in the driving position, the seat belts must always remain on the seat cushion so that they can be fastened at any time – see the sections ‘Seat belts’ and ‘Child safety’ in the Caravelle and Transporter owner’s manual.
Caution
: When using this seat belt, always ensure that both tongue tabs are securely engaged in the belt buckles – perform a pull test!
Reclining bench positions
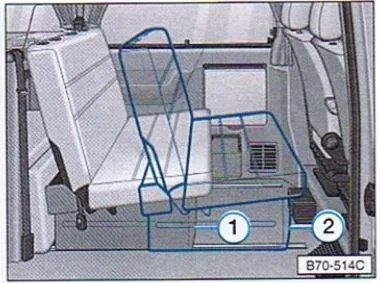
You can adjust the reclining seat/bench to two positions:
Position 1 – travelling and dining
position; Position 2 – sleeping position.
To ensure that the reclining seat/bench can slide easily along the seat rails, the T-shaped sliding blocks on the seat/bench should be treated from time to time with a non-greasy lubricant (e.g. silicone spray).
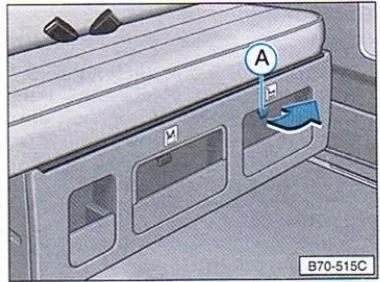
To adjust, push the lever (A) located at the front bottom of the bench to one side.
The seat/reclining bench can be adjusted in two ways:
- by moving the seat/recliner with your body (as is usual with car seats)
- by moving it by hand whilst standing in front of the bench.
Insert your hand into the left and right compartments so that you pull on the slightly recessed metal rail and not just the visible plastic fastening.
Warning
: When travelling, the seat must always be positioned on the seat rails and locked in one of the two positions so that it does not pose a safety hazard in the event of sudden braking or an accident. The correct functioning of the seat belts also depends on the seat being securely locked in place.
Folding down the reclining bench seat
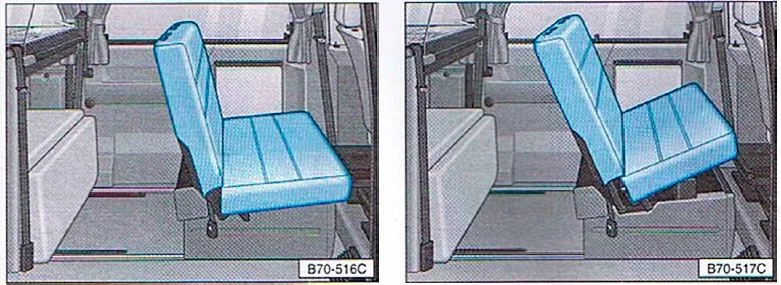
- Remove the headrests from the reclining seat/bench.
- Remove the two seat belts: Slide the left-hand three-point seat belt strap between the backrest and the side trim. Release the straps of the right-hand three-point seat belt as described above.
- Slide the other parts of the seat belt between the seat cushion and the backrest.
- Push both front seats forwards past the front stop.
- Push the bench seat into the ‘sleeping position’
- Press the release lever on the underside of the bench seat in the centre console to the left and, at the same time, lift the front of the bench seat slightly.
- Insert your hand into the recessed handles beneath the seat cushion, pull the seat cushion forwards and push the backrest backwards at the same time.
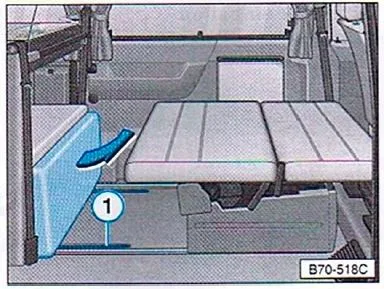 Fold the cushion, which is facing downwards, upwards into the reclining position and secure it firmly.
-
- Next, firmly snap the support bracket (1), which is hinged to the floor, into the bracket located beneath the bench seat.
Note
: Ensure that no objects in the storage compartment are trapped.
Assembling the bench
- Release the support bar whilst holding the cushion and fold both downwards.
- Fold the seat cushion upwards at the front until you hear the seat fitting click into place. The seat cushion and backrest are now almost at a right angle.
- Fold the seat cushion down again, ensuring that the backrest returns to an upright position.
- Re-engage the seat cushion into the fastening.
- Place the seat belts on the upholstery so that they can be fastened at any time. To do this, reposition the right-hand seat belt.
- Push both front seats back into the driving position.
- Fit the headrests to the backrest of the reclining seat/bench.
Storage space under the reclining seat
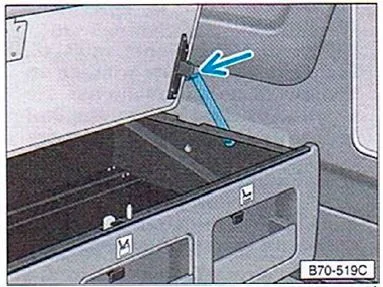
The space under the seat bench can be used for storage.
The seat bench can be secured in the open position using the bracket (arrow) located to the left of the seat frame.
Ensure that the seat bench is correctly supported by the notch in the bracket.
Caution
: Whilst travelling, passengers may only be carried on the reclining seat/bench when the seat cushion is in the travel position, so that all passengers can fasten their seat belts correctly.
In the event of an accident or sudden braking, occupants of the reclining surface may be thrown forwards uncontrollably, with a consequent risk of injury.
For this reason, the reclining surface must not be used whilst the vehicle is in motion.
Removing the reclining seat/bench
Note
: Ensure that straps, side panels, cupboards, etc. are not damaged or soiled when removing and fitting the bench.
For this reason, the bench must be removed and fitted by two people.
Control unit
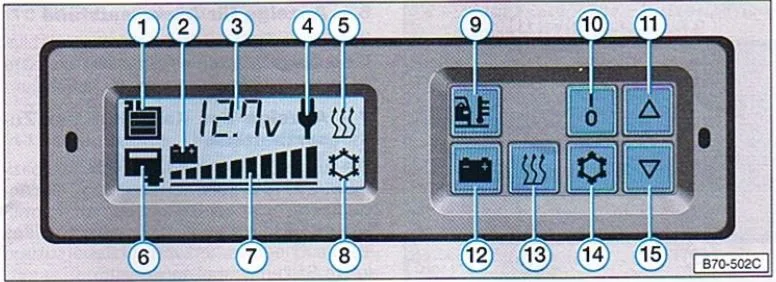
In the driver’s cab, above the interior light, is the central console or control unit with the following indicators:
1- Clean water level indicator. The display consists of three bars. When the lowest bar goes out, there are still around 9 litres of water remaining.
2- Auxiliary battery status display. The symbol appears when power is supplied exclusively by the auxiliary battery, i.e. when it is not being recharged by the charger or alternator. If the voltage drops to 10.5 volts due to connected electrical loads, the symbol flashes and the fridge switches off automatically.
3- Auxiliary battery voltage display. To view this, press button 12.
3- Display of the selected temperature for the auxiliary heating. To view this, press button 13.
3- Display of the selected temperature for the fridge. To view this, press button 14.
3- Display of the outside temperature. To view this, press button 9.
3- Display of faults in the operation of the auxiliary heating system. If there are faults in the operation of the heating system, an error code appears on the screen and symbol 5 flashes.
4- Mains voltage and charger display. The symbol appears when mains voltage is present and the charger is operating. In the event of a power cut or a fault with the charger, the symbol disappears.
NOTICE: If the battery voltage indicator flashes whilst mains power is present and shows a value greater than 15 volts, there is a fault.
5- Auxiliary heating operation display. The symbol appears as soon as the heating is switched on. In the event of a fault, the symbol flashes and an error code appears on the display.
6- Waste water level indicator. When the tank is full, the symbol flashes. After pressing any key, the flashing changes to a steady light.
7- Auxiliary battery level display. The available capacity is shown in 10 per cent increments. When running on battery power, the display changes approximately 5 minutes after the appliance is switched on. Prior to this, only the first and last bars are shown.
8- Fridge operation symbol. The symbol appears as soon as the fridge is switched on. In the event of a fault, the symbol flashes.
9- External temperature button. The reading is shown on display 3.
10- Switching the fridge on/off. Pressing buttons 10 and 14 simultaneously switches the fridge on or off. When switched on, symbol number 8 appears.
11- Button to increase fridge temperature. Each press increases the temperature by 1°C within the range of -20°C to +20°C. Button 14 must be held down. The set temperature appears on the display in section 3.
11- Button to increase the auxiliary heating temperature. Each press of this button increases the heating level by one step within the range of 10 to 30 degrees. Button 13 must be held down. The set temperature appears on the display in section 3.
12- Auxiliary battery voltage button. The display remains on until button 9 is pressed.
13- Auxiliary heating on/off. Pressing buttons 10 and 13 simultaneously switches the auxiliary heating on or off. When switched on, symbol number 5 appears. If only button 13 is pressed, the set heating level will appear in section 3 of the display.
NOTICE: The heating air inlet is located on the side panel beneath the folding table. The hot air outlet is located on the floor, behind the driver’s seat. Do not block the heating air inlet or outlet, or the heating will switch off.
14 – Button to set the fridge temperature. Whilst this button is held down, the set fridge temperature will be displayed.
15- Button to lower the fridge temperature. Operates in the same way as button 11.
15- Button to lower the auxiliary heating temperature. Operates in the same way as button 11.
Display lighting.
The display will light up for approximately 3 minutes when any button is pressed. The lighting is also linked to the vehicle’s own interior lighting.
When the auxiliary heater is running, the display will remain lit for as long as it is in operation.
Fuses
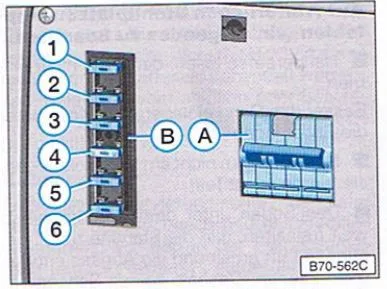
All electrical circuits are protected by fuses and circuit breakers. Before changing fuses or checking the circuit breaker, you must move the seat forwards.
The residual current device and the fuse box for 12V electrical circuits are located behind a lockable flap fitted to the left-hand side wall, beneath the kitchen unit. To open the flap, turn the locking knob.
A. Residual current circuit breaker for 220/230-volt appliances.
B. Fuse box for 12-volt appliances
| 1 – Central electronics | 5 A |
| 2 – Water pump | 7.5 A |
| 3 – Interior light | 7.5 A |
| 4 – Auxiliary heating | 25 A |
| 5 – Free | – |
| 6 – Fridge | 15 A |
Fridge
The fridge lid can be used as a dish drainer. Do not place hot pots or pans on the lid as this will damage it.
Before using the fridge for the first time, you should clean the inside of the compartment with warm water to which a cleaning agent has been added.
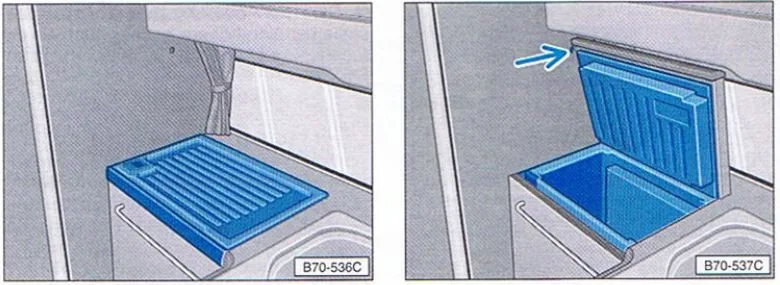
To allow you to easily remove or place refrigerated items, the lid is held open by a protrusion on the wall. Before closing the lid, press the button.
The fridge operates regardless of whether the engine is running. It is powered exclusively by the auxiliary battery. The fridge is switched on, switched off and controlled via the control unit.
General tips for the correct operation of the fridge
The fridge must be allowed to cool down before food and drink are stored inside. Furthermore, items to be stored should only be taken out of your domestic fridge shortly before setting off on your journey and as soon as possible after being purchased from the supermarket.
Under no circumstances should hot food or drinks be placed in the fridge whilst it is switched on!
Food should, where possible, be stored in airtight containers to prevent it from drying out, spilling or giving off odours. Furthermore, these help to delay the build-up of ice on the evaporator (ice build-up significantly reduces efficiency, leading to higher energy consumption and poorer cooling performance). Frequent opening of the fridge door also encourages excessive ice build-up.
The fridge must not be overfilled, so as not to impede the circulation of cooling air.
The fridge is fitted with air intake and exhaust filters in the vehicle floor. These filters should be checked at least once a year.
To prevent ice build-up, the fridge must be defrosted periodically. To do this, switch off the fridge and open the door. Do not speed up the process by introducing a heat source. Condensation must be removed before switching it back on.
The fridge should be cleaned with water to which a little vinegar has been added. To prevent the growth of mould and mildew if the fridge is not used for a long time, the lid should be kept slightly open by placing a cloth folded several times between it and the fridge.
| 1 | Centre console |
| 2 | Swivel front seats |
| 3 | Dining tables / folding tables |
| 4 | Reclining seat / bench |
| 5 | Kitchen unit with sink, gas hob, waste water tank and gas cylinder holder |
| 6 | Fridge |
| 7 | Adjoining cupboard with bin bag holder |
| 8 | Hinged door with lock |
| 9 | Cupboard with compartment for valuables |
| 10 | Hatch release button |
| 11 | Bathroom |
| 12 | Folding washbasin |
In addition to the specified fittings, the bathroom area features a drinking water tank and a 220/230V power socket, which is also located in the living area beneath the folding table.
The roof bed platform is also situated above the swivel front seats.
Access from the outside to:
- Toilet waste cassette
- 220/230V power socket
- Fresh water inlet
- Drain outlet for the fresh water tank
- Drain outlet for the waste water tank
We will provide you with the following keys with your motorhome:
A. This key fits all locks except:
-
- Opening/closing the fresh water filler cap.
-
- Lockable storage compartment.
- Lockable storage compartment.
B. You can use this key to open and close the clean water fill-up flap. The lock is located behind a flap on the outside at the rear
C. This key is for the valuables compartment located in the cupboard (9)
The drawers and doors are fitted with locks to prevent them from opening accidentally whilst driving. To open, pull the flap. Unlocking the furniture will be easier if you press the drawer or door at the same time as pressing the button on the handle.
Before opening the roof hatch, lower the fly screen.
To open the hatch, push both handles upwards evenly. The hatch can be lowered to either side whilst open.
The fly screen can be removed for cleaning. To do this, unhook the screen from the recessed handle, turn it downwards and remove it.
To fit it, insert the screen with the two retaining tabs into the slots (arrows) in the frame, turn it upwards and secure it firmly.
Notes
- Open the sunroof when cooking to allow cooking vapours to escape.
- To prevent draughts and damage to the skylight, keep it closed whilst driving.
Opening the windows
Fully release the locking lever (A) on all the window latches. Then move the window to the desired position and turn the sleeve (B) on the bracket.
Closing the window
Turn the sleeve (B) on the bracket and lower the window.
Before closing the window, ensure that all the hooks (C) on the retainers are simultaneously behind the edge of the corresponding bracket (D).
Warning
: For safety reasons, all opening windows must always be closed and locked whilst the vehicle is in motion.
All opening windows in the high roof are fitted with a blackout roller blind and a fly screen.
The illustration shows both roller blinds in a half-open position. Both roller blinds can be raised and lowered together or separately.
Insect
screen roller blind Pull the insect screen roller blind upwards from the bottom.
The roller blind can be adjusted continuously and locked in any position.
Blackout
blind Pull the blackout blind downwards.
The blind can be adjusted continuously and locked in any position.
All interior windows can be darkened with blinds.
The cabin blind is located inside the vehicle.
It is fastened from the inside using press studs and secured above the windscreen by folding down the two sun visors.
The illustration shows how the blind components are attached to the interior trim using the press stud.
The base of the press stud (A) is firmly attached to the interior trim. The closed press stud (C) on the curtain is pressed onto this base.
If the press studs from two sections of the curtain are to be attached to a single base (A), first press the section of the curtain onto the base to which the open press stud (B) is attached. Then press the section of the curtain with the closed press stud (C) onto the open press stud.
The front seats swivel and can therefore also be used in the living area.
The release mechanism for the swivel mechanism is located at the bottom right of the seat base on both seats. To release it, pull the lever upwards.
The passenger seats are swivelled anti-clockwise by pushing the driver’s seat fully backwards. If necessary, open the doors and adjust the seat backs slightly forwards.
If the reclining seat/bench is to be converted into a reclining surface, first push the forward-facing front seats forwards beyond the front stop.
To do this, push the seat right up to the stop. Then press the lever (arrow) downwards and continue pushing the seat forwards until it passes the stop. This position is only permitted for adjusting the reclining surface.
Warning
-
- Before swivelling the driver’s seat, apply the handbrake or otherwise secure the vehicle to prevent it from moving (engage a gear or block the wheels).
-
- Swivel seats must always face forwards and be securely locked in place whilst driving.
-
- The two front seats must never be used if they have been moved forwards beyond the front stop.
The dining table is secured to the inside of the cupboard door. Turn the lever upwards and remove the table from its holder.
Assembling the dining table
-
- Position the tabletop at an angle of approx. 45° upwards on the retaining strip (arrow) on the side panel.
-
- Release the table leg (A) from the clamp at the bottom of the tabletop and tilt the table downwards.
-
- Place the end of the leg onto the right-hand seat bar (B) and slot it into place.
Dismantling the dining table
Dismantling is carried out in reverse order.
Please note that before releasing the table leg, you must press the latch (arrow) located inside the leg.
Folding table
-
- Release the tabletop from the clamping mechanism with a gentle tug and lift the table until it clicks into place.
-
- To fold it down, press the safety button (arrow) on the base of the table and lower the tabletop until it clicks into place.
Warning
: The folding table must not be set up whilst the vehicle is in motion, as there is a risk of injury in the event of an accident or sudden braking.
The table must therefore be folded away and locked in place during the journey.
Rear seat belt
The automatic three-point seat belt on the right-hand side of the forward-facing seat/reclining seat has the following feature:
in addition to the standard buckle section, there is another buckle section on the right-hand side of the seat. After unfastening the seat belt, it can be released completely by pressing the button on the right-hand locking section (arrow) so that the seat can be moved forwards more easily.
To prevent the button from being released accidentally whilst travelling, the locking mechanism is fitted with a sliding cover which must always enclose the locking mechanism.
When the reclining seat is in the driving position, the seat belts must always remain on the seat cushion so that they can be fastened at any time – see the sections ‘Seat belts’ and ‘Child safety’ in the Caravelle and Transporter owner’s manual.
Caution
: When using this seat belt, always ensure that both tongue tabs are securely engaged in the belt buckles – perform a pull test!
Reclining bench positions
You can adjust the reclining seat/bench to two positions:
Position 1 – travelling and eating
position; Position 2 – sleeping position.
To ensure that the reclining seat/bench can slide easily along the seat rails, the T-shaped sliding blocks on the seat/bench should be treated from time to time with a non-greasy lubricant (e.g. silicone spray).
To adjust, push the lever (A) located at the front bottom of the bench to one side.
The seat/reclining bench can be adjusted in two ways:
- by moving the seat/recliner with your body (as is usual with car seats)
- by moving it by hand whilst standing in front of the bench.
Insert your hand into the left and right compartments so that you pull on the slightly recessed metal rail and not just the visible plastic fixing.
Warning
: When travelling, the seat must always be positioned on the seat rails and locked in one of the two positions so that it does not pose a safety hazard in the event of sudden braking or an accident. The correct functioning of the seat belts also depends on the seat being securely fastened.
Folding down the reclining bench seat
- Remove the headrests from the reclining seat/bench.
- Remove the two seat belts: Slide the left-hand three-point seat belt strap between the backrest and the side trim. Release the straps of the right-hand three-point seat belt as described above.
- Slide the other parts of the seat belt between the seat cushion and the backrest.
- Push both front seats forwards past the front stop.
- Push the bench seat into the ‘sleeping position’
- Press the release lever on the underside of the bench seat in the centre console to the left and, at the same time, lift the front of the bench seat slightly.
- Insert your hand into the recessed handles beneath the seat cushion, pull the seat cushion forwards and push the backrest backwards at the same time.
Fold the cushion, which is facing downwards, upwards into the reclining position and secure it firmly.
-
- Next, firmly snap the support bracket (1), which is hinged to the floor, into the bracket located beneath the bench seat.
Note
: Ensure that no objects in the storage compartment are trapped.
Assembling the bench
- Release the support bar whilst holding the cushion and fold both downwards.
- Fold the seat cushion upwards at the front until you hear the seat fitting click into place. The seat cushion and backrest are now almost at a right angle.
- Fold the seat cushion down again, ensuring that the backrest returns to an upright position.
- Re-engage the seat cushion into the fastening.
- Place the seat belts on the upholstery so that they can be fastened at any time. To do this, reposition the right-hand seat belt.
- Push both front seats back into the driving position.
- Fit the headrests to the backrest of the reclining seat/bench.
Storage space under the reclining seat
The space under the seat bench can be used for storage.
The seat bench can be secured in the open position using the bracket (arrow) located to the left of the seat frame.
Ensure that the seat bench is correctly supported by the notch in the bracket.
Caution
: Whilst travelling, passengers may only be carried on the reclining seat/bench when the seat cushion is in the travel position, so that all passengers can fasten their seat belts correctly.
In the event of an accident or sudden braking, occupants of the reclining surface may be thrown forwards uncontrollably, with a consequent risk of injury.
For this reason, the reclining surface must not be used whilst the vehicle is in motion.
Removing the reclining seat/bench
Note
: Ensure that the straps, side panels, cupboards, etc. are not damaged or soiled when removing and fitting the bench.
For this reason, the bench must be removed and fitted by two people.
In the driver’s cab, above the interior light, is the centre console or control unit with the following indicators:
1- Clean water level indicator. The display consists of three bars. When the lowest bar goes out, there are still around 9 litres of water remaining.
2- Auxiliary battery status display. The symbol appears when power is supplied exclusively by the auxiliary battery, i.e. when it is not being recharged by the charger or alternator. If the voltage drops to 10.5 volts due to connected electrical loads, the symbol flashes and the fridge switches off automatically.
3- Auxiliary battery voltage display. To view this, press button 12.
3- Display of the selected temperature for the auxiliary heating. To view this, press button 13.
3- Display of the selected temperature for the fridge. To view this, press button 14.
3- Display of the outside temperature. To view this, press button 9.
3- Display of faults in the operation of the auxiliary heating system. If there are faults in the operation of the heating system, an error code appears on the screen and symbol 5 flashes.
4- Mains voltage and charger display. The symbol appears when mains voltage is present and the charger is operating. In the event of a power cut or a fault with the charger, the symbol disappears.
NOTICE: If the battery voltage indicator flashes whilst mains power is present and shows a value greater than 15 volts, there is a fault.
5- Auxiliary heating operation display. The symbol appears as soon as the heating is switched on. In the event of a fault, the symbol flashes and an error code appears on the screen.
6- Waste water level indicator. When the tank is full, the symbol flashes. After pressing any key, the flashing changes to a steady light.
7- Auxiliary battery level display. The available capacity is shown in 10% increments. When running on battery power, the display changes approximately 5 minutes after the appliance is switched on. Prior to this, only the first and last bars are shown.
8- Fridge operation symbol. The symbol appears as soon as the fridge is switched on. In the event of a fault, the symbol flashes.
9- External temperature button. The reading is shown on display 3.
10- Switching the fridge on/off. Pressing buttons 10 and 14 simultaneously switches the fridge on or off. When switched on, symbol number 8 appears.
11- Button to increase fridge temperature. Each press increases the temperature by 1°C within the range of -20°C to +20°C. Button 14 must be held down. The set temperature appears on the display in section 3.
11- Button to increase the auxiliary heating temperature. Each press of this button increases the heating level by one step within the range of 10 to 30 degrees. Button 13 must be held down. The set temperature appears on the display in section 3.
12- Auxiliary battery voltage button. The display remains on until button 9 is pressed.
13- Auxiliary heating on/off. Pressing buttons 10 and 13 simultaneously switches the auxiliary heating on or off. When switched on, symbol number 5 appears. If only button 13 is pressed, the set heating level will appear in section 3 of the display.
NOTICE: The heating air inlet is located on the side panel beneath the folding table. The hot air outlet is located on the floor, behind the driver’s seat. Do not block the heating air inlet or outlet, or the heating will switch off.
14 – Button to set the fridge temperature. Whilst this button is held down, the set fridge temperature will be displayed.
15- Button to lower the fridge temperature. Operates in the same way as button 11.
15- Button to lower the auxiliary heating temperature. Operates in the same way as button 11.
Display lighting.
The display will light up for approximately 3 minutes when any button is pressed. The lighting is also linked to the vehicle’s own interior lighting.
When the auxiliary heater is running, the display will remain lit whilst it is in operation.
All electrical circuits are protected by fuses and circuit breakers. Before changing fuses or checking the circuit breaker, you must move the seat forwards.
The residual current circuit breaker and the fuse box for 12V electrical circuits are located behind a lockable flap fitted to the left-hand side wall, beneath the kitchen unit. To open the flap, turn the locking knob.
A. Residual current circuit breaker for 220/230-volt appliances.
B. Fuse box for 12-volt appliances
| 1 – Central electronics | 5 A |
| 2 – Water pump | 7.5 A |
| 3 – Interior light | 7.5 A |
| 4 – Auxiliary heating | 25 A |
| 5 – Free | – |
| 6 – Fridge | 15 A |
The fridge lid can be used as a dish drainer. Do not place hot pots or pans on the lid as this will damage it.
Before using the fridge for the first time, you should clean the inside of the compartment with warm water to which a cleaning agent has been added.
To allow you to easily remove or place refrigerated items, the lid is held open by a protrusion on the side panel. Press the button before closing the lid.
The fridge operates regardless of whether the engine is running. It is powered exclusively by the auxiliary battery. The fridge is switched on, switched off and controlled via the control unit.
General tips for the correct operation of the fridge
The fridge must be allowed to cool down before food and drink are stored inside. Furthermore, items to be stored should only be taken out of your domestic fridge shortly before setting off on your journey and as soon as possible after being purchased from the supermarket.
Under no circumstances should hot food or drinks be placed in the fridge whilst it is switched on!
Food should, where possible, be stored in airtight containers to prevent it from drying out, spilling or giving off odours. Furthermore, these help to delay the build-up of ice on the evaporator (ice build-up significantly reduces efficiency, leading to higher energy consumption and reduced cooling performance). Frequent opening of the fridge door also encourages excessive ice build-up.
The fridge must not be overfilled, so as not to impede the circulation of cooling air.
The fridge is fitted with air intake and exhaust filters in the vehicle floor. These filters should be checked at least once a year.
To prevent ice build-up, the fridge must be defrosted periodically. To do this, switch off the fridge and open the door. Do not speed up the process by introducing a heat source. Condensation must be removed before switching it back on.
The fridge should be cleaned with water to which a little vinegar has been added. To prevent the build-up of mould and mildew if the fridge is not used for a long time, the lid should be kept slightly ajar by placing a cloth folded several times between it and the fridge.
Are you looking for spare parts for your VW T4 California Exclusive?
Complete catalogue of parts, accessories and manuals designed specifically for the Volkswagen T4 California Exclusive.
Go to the T4 shop